Many of us have limited sky views. As I’ve mentioned a thousand times here, my backyard view is abysmal. Not only do I have no view of Polaris… I have no view of any place in the sky where even drift alignment would lead to accurate results. The best I was able to get was with Celestron’s All-Star polar alignment routine on the hand controller. It worked, but it was cumbersome and time consuming.
That changed this summer when EKOS updated its routine (which previously required a Polaris view) to work pretty much anywhere in the sky. This is a feature that I’ve heard high-end software packages like TheSkyX have implemented, but, of course, EKOS is free (but please donate). It’s new enough that it hasn’t made it in to the documentation yet, but there are several videos on how it works online now.
The Process
First, make sure your mount is roughly aligned and your OTA pointed at the celestial pole. Use whatever method you want for that. I use the “daytime” rough alignment function on PS Align Pro on my phone. Once you’re roughly aligned, fire up EKOS and slew your mount to a place in the sky that has at least 70-90 degrees from the meridian either east or west that are not obstructed by trees or buildings. Some online and in the INDI forums have suggested getting as close to the Pole as you can reasonably get.
In essence here’s how it works:
As usual, the polar alignment routines are in the Alignment Module. While there’s no documentation on this, I believe it’s best to do the PA routine before you do any plate solving.

The routine is going to do three plate solving iterations each a specified number of degrees apart in order to estimate your PA error and work out a solution to correcting that error. You’ll notice options at the bottom for which direction to slew, how far for each iteration, and how fast the mount should move. Note that you cannot pass the meridian for this, and you’ll get an error if you try. I usually start about 5 deg. east or west of the meridian and at about 80 deg. in alt. I choose 20 degrees for each slew to make sure I stay in my narrow sky opening. I’ve read that some folks have success with as little as 15 deg. The default is 30. When you’re all set, hit “Start.”

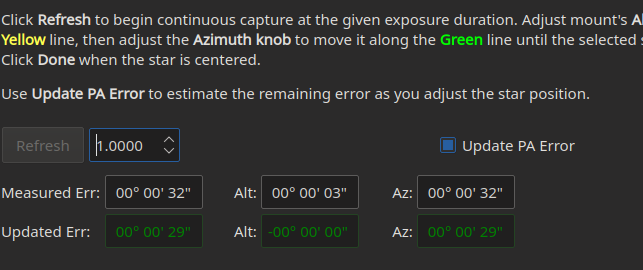
EKOS will then take an image and plate solve your current position, then slew the specified number of degrees in the specified direction for the second capture. Assuming there’s still a clear view of the sky, it will plate solve the second image and move to the third position. When that’s done, you’ll be presented with an estimate of your polar error and a triangle on the last image capture representing the solution (physically moving the altitude and azimuth knobs on your mount) to bring you into polar alignment. At that point, you want to zoom in and select a bright star to perform the alignment on.

You’ll notice here that my error here using the EKOS simulators is just 30 arc seconds, well within where I’d typically want to be and where I’d probably call this good and move to imaging in the real world. Usually, I’m several arc minutes out of whack and my triangle much larger that what’s depicted above, and the next step is to hit the “refresh” button and start a repeated loop of images a you adjust your mount’s knobs to bring the highlighted star to where it should be if your mount was properly aligned. Altitude follows the yellow line, and azimuth the green until you get it on the nose.
Handily, you’ll notice that there’s an option to check “Update PA Error.” If you do that, you’ll notice a refreshed error directly below the Measured Error spot, so you can keep track of how close you’re getting.

Once you’re satisfied, hit “Done” and you’re all set. To fine tune things, an additional round can easily be done, which is recommended if your initial rough alignment was pretty out of whack.
Some Tips
I’ve found a couple of things that make things work a bit more smoothly. First, if you’re working in a long focal length, it’s pretty easy for your rough alignment to be so far out from where it should be that the end goal of the triangle created when you select a star to align on is out of your frame. Shooting at 1422mm as I often am with my C8, this has been a frequent occurrence meaning you have to do multiple iterations of the process as you get closer to being in alignment.
Instead, I’ve found a good way to keep this down to exactly two alignment rounds. First, I align on my guide scope and guide camera. While they’re not perfectly on axis with my imaging scope, they’re pretty darn close. With a much more forgiving focal length, I have yet to run into the “off the screen” star problem. At least with my setup, aligning with the guide scope gets me within 2′-4′ arc minutes. I then run another routine with my main scope that usually gets me below 1′ on the first try and with the triangle fitting well within even zoomed-in range.
Second, when aligning with my ASI 2600MC and its huge file size, I’ve found 1 second exposures at 2×2 binning makes for more accurate results. At 1×1 things can bog down meaning a significant lag between the time you turn an alt or az knob and the time you see the impact of that turn on the screen.
The Results
Like I said, I’ve been getting consistently at or below 1′ with this method, although there’s a current thread on the INDI forums about a discrepancy between the PA error measurements between EKOS and PHD2. But, seems like that may have been user error or someone attempting to PA using a very, very short focal length. In the end, as they say, seeing is believing. Here is a 5 minute unguided exposure (not calibrated, so excuse the vignetting). Fair enough, this was at a pretty forgiving 390mm focal length, but there’s no drift apparent (except for my poorly collimated HyperStar issues in the corners).


All-in-all, a great success with much kudos to the INDI/EKOS team (especially the author, Hy Murveit!). This tool has made one of the most time consuming and frustrating parts of my backyard imaging almost… dare I say… enjoyable? Many thanks!
This is great information. I really appreciate it.