


The first “problem” to overcome with an off-grid all-sky camera is connectivity. There’s no sense in taking all-sky photos if you can’t get them uploaded someplace you can see them. I briefly considered a SkyLink satellite internet setup, despite my strong desire not to give Elon Musk any of my money—ever. But expense and power draw of StarLink (75 watts at peak use) quickly ruled that option out. With satellite off the table, there was really only one other option: cellular. The property this system will be installed on is remote, but it’s high enough up that we get a fair 5G signal from AT&T at the high point of the parcel, happily just where the all-sky camera will go. So, after considering then dismissing a NetGear Nighthawk (again out of cost and power consumption concerns), I decided to explore cellular hat options for a Raspberry Pi.
The Modem:

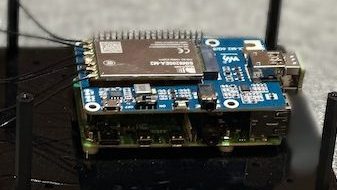
To call this a niche market is an understatement. There are few options when it comes to 5G capability, and most IoT (internet of things) technology in this area is geared to the commercial rather than consumer side. In fact, I found exactly two viable options: SixFab’s 5G development kit at $600 and WaveShare’s RPi hat at $300. Very similar hardware on each, so the choice to go with WaveShare was an easy one with its SIM8200EA-M2 5G module. At $300, it’s way below the cost of StarLink hardware and half the cost of either the SixFab unit or a good mobile hotspot. The kit comes with an open-style case (made of fairly flimsy plastic), a cellular antennae, and a GPS antenna that I don’t really need because this is a stationary system. Setup was straightforward, and the hat fit easily onto my RPi. The hat requires power via a mini-USB connector and came with its own 5v 3a power supply. But, perhaps risking low-voltage errors from the RPi, I opted to power the modem hat via the unused USB3 ports on the RPi itself. So far that has worked out and low-voltage has not been an issue. More importantly, the power consumption is incredibly low: about 5 watts peak.
Like any cellular setup, the module needs an activated SIM card. I originally considered a Mint Mobile unlimited data SIM, but then I realized that, as far as the cellular network is concerned, the RPi would basically appear as just another phone. With that in mind, I went to my local AT&T store and added a new line to my existing family unlimited data plan. That additional link costs $30 per month (discounted to $20 per month on my family plan) instead of the $100+ per month most companies charge for unlimited cellular hotspot data. This was by far the cheapest way to go.
After the SIM card was installed, I installed the drivers for the modem on the RPi and followed the instructions on the WaveShare website to set things up for RDNIS “dial-up.” After launching the Python script from WaveShare, the modem connected and acquired an IP address from the mobile network. We had connectivity! I added the python script to my rc.local file, and now the modem was set to connect automatically on boot up.
Making It Accessible: Of course, having connectivity is only half the battle. I want to be able to access the all-sky machine remotely to monitor how things are going and do maintenance. This all-sky setup is also a preface to what will hopefully be a remote observatory one day, so testing speed and usability of remote software control is a big part of what I’m trying to accomplish here.
The remote control solution took some home network effort. Mobile networks do not allow port forwarding. So, while I have a VNC server and ssh opened up on the RPi, there’s no way to access them via the mobile IP address. The solution was the inverse of what most remote setups require. Instead of using a VPN to connect to the remote network (again, impossible due to cellular network port blocking), I created a private VPN on my home desktop Linux box and set the RPi to connect to it automatically. This way the RPi would appear as if it was on my home network, and any computer either on my home network (or connected remotely to the VPN) would be able to access the RPi.
For that task, I installed an OpenVPN server on my home Linux box, then set up VPN clients on my laptop, cell phone, and the RPi all-sky. Because my home internet IP address changes from time to time, I also used No-IP, a handy and inexpensive service that allows a domain name to be assigned to (and always follow) a dynamic IP address. This is critical because, if the remote machine is set to connect to a dynamic IP and that address changes, that’s a 4-hour drive to change the address manually in person. Once set up, anywhere I have an internet connection I can access my home VPN and any device connected to it as if they are on the same network–with all traffic routed behind a fairly ironclad and encrypted pipeline.
Once installed on the RPi, everything worked great with one hiccup: a couple of times over the course of a few days the RPi briefly lost its cellular connection and could not re-establish the connection to the VPN until the network was rebooted. I never quite tracked down what was going on during these events because they were really sporadic and other connectivity losses did not result in a permanent disconnect from the VPN. But, clearly, any loss of service like that would make remote management impossible without the aforementioned 4-hour drive to troubleshoot in person. I needed something to automatically detect a loss of VPN connectivity and reboot until connection is reestablished. For that, I wrote a very simple script to check the VPN connection via a single ping to the VPN server’s local VPN address. If the ping fails, the machine reboots.
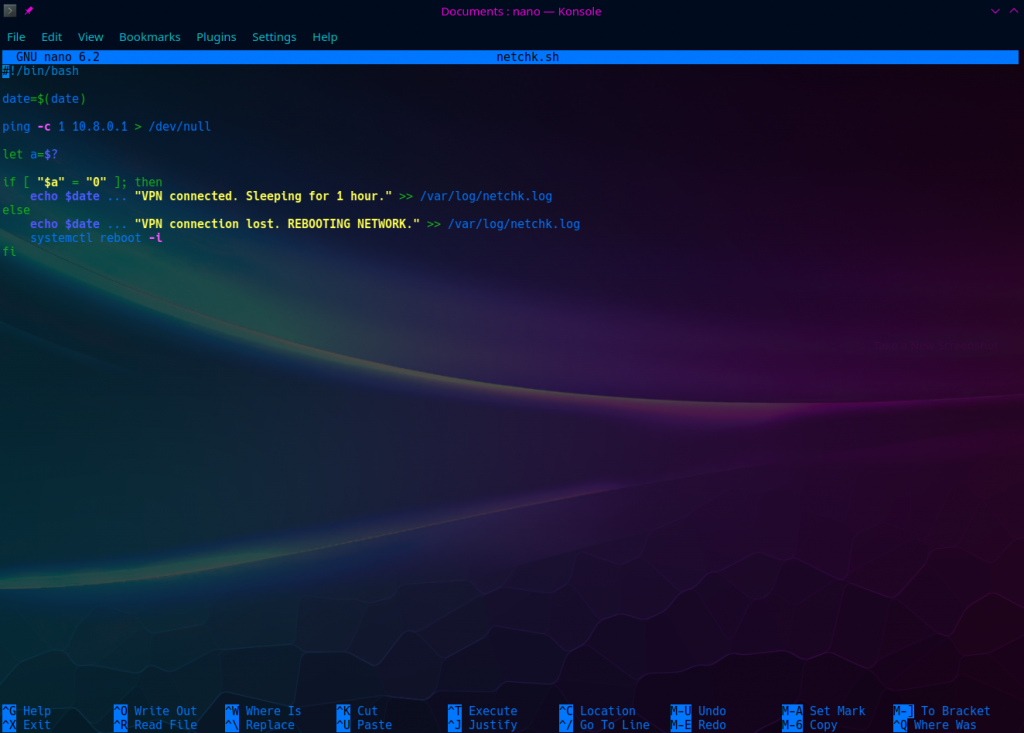
I then set that script to run every half-hour via crontab. Of course, once this was setup and running, the problem stopped even after several straight days of uptime. Still, I feel better having this as a fail safe just in case.
Real World Testing: Once everything was functioning, it was time to test the setup. I had a mountain bike race weekend where I’d be camping in a spot with pretty good cell reception and fairly dark skies, so I packed up the RPi setup and my ASI 224MC and hauled them into the woods. The first night of camp, I set everything up and powered things from the auxiliary battery in my truck. Some high clouds interrupted some of the field of view (plus there were plenty of trees at this spot), but the initial results were promising.
Now it was on to the next of the problems… how to power things completely off-grid. That story in the next installment.